 |
| Bantam T3-C Serial number 24011 |
One day I was browsing Craigslist for no particular reason and came across an ad for a free trailer. I had been off and on looking for a small utility trailer to use when the camper was on the truck, for camping and general hauling purposes. I had seen many examples along the way of people re-purposing old military trailers. Compact size, rugged construction and high clearance designed for off road use makes these trailers ideal for camping.
The ad said: WWII Bantam Army trailer- Free
 |
| Craigslist ad photo |
This ad caught my eye both for the trailer and for the price: FREE.
I have learned over the years that many free gifts are too expensive to accept- but more about that later. Why was it free? The owner said the wheels were rusted on so severely that the badly deteriorated tires could not be replaced. There were also a few rusted holes in the floor, which was badly dented. The tailgate was bolted shut. The coupler was bent from the owner's son jack-knifing the trailer trying to back up.
The trailer had been in the owner's family since almost new. His father had acquired it in the early 1950s and had used it for fishing and hunting trips. When he died it passed to his son, the current owner. He hoped it would go to someone who would appreciate it and fix it up.
 |
| Craigslist ad photo |
 |
| Craigslist ad photo |
It was perfect for what I was looking for and the price was right. I ignored all the red flags that argued for passing it by and told the man I would haul it away. He was not sure I would make it home. I promised to call him to let him know when I arrived safely at home. I took the back roads and side streets and made it home without incident.
Once home I dove into the internet to figure out what I had. I discovered an interesting story behind this trailer.
It was built by the American Bantam Car Company of Butler, PA in 1947. The American Bantam Car Company is best known as the winner of a competition with Willys Overland and Ford Motor Company for the design of what became the ubiquitous Jeep for the US Army in 1940. Although credited with the best original design, Bantam was deemed too small to produce the quantity of Jeeps required by the army. After some further development by all three companies, the Army awarded production contracts to Willys Overland and Ford. American Bantam Car Company was tasked with designing and producing various trailers for the war effort. Bantam built over 75,000 of its quarter-ton trailers, known as the T3, for the Army.
 |
| WWII Army Jeep and trailer (Wikipedia) |
After the war and the end of the Army contracts, the American Bantam Car Company tried to stay in business by selling its T3 trailers to the civilian market. These trailers were modified to appeal to the civilian market with the addition of a tailgate and ball-style coupler. A few cost-saving modifications were made, such as reducing the number of tarp hooks and eliminating shock absorbers and the parking brake. These trailers were designated as the Bantam T3-C. Thousands of trailers were sold but ultimately the company declared bankruptcy in 1950 and ceased operations. It was acquired by Armco Steel Company in 1956 and the Bantam name disappeared.
More information about the development of the Jeep and trailer can be found at these links:
https://en.wikipedia.org/wiki/Willys_MB
https://en.wikipedia.org/wiki/American_Austin_Car_Company#American_Bantam
https://en.wikipedia.org/wiki/Jeep_trailer
More information about Bantam T3-C trailers can be found at the Bantam T3-C website:
http://bantamt3c.com/
My little trailer turned out to be a T3-C. It still had the original data tag riveted to the front. After some careful cleaning and detective work, the tag revealed the original serial number of the trailer to be 24011, placing its production date around 1947. These trailers are highly sought by early Jeep collectors as a piece of history and a required accessory for their Jeeps.
 |
| Original data tag showing serial number 24011 |
With all of this background information the trailer took on a new meaning for me. It was no longer just a free utility trailer. It was a piece of history. I was hooked. I set about to bring it back to life.
The first task was to get some new tires on the trailer. I had learned through my research that these trailers had reverse threaded lug nuts on the driver's side. That explained why the previous owner had been unable to loosen the lug nuts - he was tightening them instead! One of the lug nuts was stripped as a result and I had to cut it off. The rest came loose relatively easily with liberal application of some PB Blaster rust solvent. Once off, I removed the hubs to check the bearings. Amazingly, they looked good so I repacked them with grease and put them back together. I got new lugs from
Midwest Military- a great resource for parts and advice I discovered in my internet research. I had the wheels sandblasted and bought some new tires. Although the Bantams originally had Firestone street tires on them, I opted for the old military style as more suitable for off-road use. I also removed the coupler and straightened it out and made a new locking tab which had been broken off at some point in the past.
 |
| New tires |
 |
| Original Fulton 06 hitch coupler prized by collectors |
 |
| I made a replacement hitch coupler locking tab |
Once the trailer was road worthy, I took it over to a friend of a friend's place to get some advice. Wayne is an accomplished car restorer. He and I had met while helping a mutual friend build a cabin the woods of northern Minnesota. I thought maybe Wayne could help me out with some of the tasks that I couldn't do- such as welding and metal repair. Wayne was in the midst of a project to restore and customize a 1959 Chevrolet pickup truck. He really didn't need another project. But he kindly took pity on me and offered his help and his shop space to take on what we both thought was a simple project to make a few repairs. It quickly blew up into a much bigger undertaking.
 |
| View of rusted underside |
 |
| Fender brackets |
 |
| Beginning disassembly |
 |
| Springs and hub |
We started by disassembling the trailer so we could treat a few rust spots. It quickly became apparent there was more damage than first appeared. The floor was badly dented and more rusted than thought. A few rusty spots in the frame became full-fledged holes when we poked at them. The brackets holding the fenders on were rusting through the trailer sides. Many of the bolts holding the trailer together were rusted and broke during disassembly. Each problem was relatively minor but they added up to a lot of work.
 |
| Rusted trailer top rail |
 |
| Rust hole in frame |
 |
| Rust damage at front wall |
 |
| Floor removal in process |
 |
| Walls freed from floor |
 |
| Floor showing dents |
 |
| Underside of floor |
 |
| Underside of floor |
A major decision was what to do about the floor. On close inspection, it was in bad shape, rusting from the bottom up. It turned out that I could get an exact replacement floor from Midwest Military. We decided to cut the old floor out. This allowed us to get at the whole frame of the trailer, cut out all the rusted areas and weld new metal in place. This decision, while creating a lot of extra work, really made the finished product so much better. There is no longer any rust anywhere on the trailer.
 |
| Walls after sandblasting |
 |
| Test fit of new floor |
 |
| New floor detail |
 |
| Frame detail showing new metal for rust repair |
 |
| Welding repairs to frame |
 |
| Fully repaired frame- no remaining rust damage |
Once disassembled, we took all the parts to a sandblaster to have them cleaned up of rust and old paint. After sandblasting, we were able to see that one of the leaf spring packs had a broken leaf. Sandblasting also revealed that the two spring packs were not a matched set so one had been replaced already. I decided to buy new matching springs. I also bought new bushings and bearings and seals for the hubs. At this point I also decided to add shocks back on the trailer to improve its handling characteristics. The trailers were originally designed to share suspension parts with the Jeeps that pulled them for redundancy. Jeeps are still popular and all these parts were readily available from Jeep parts suppliers.
 |
| Parts after sandblasting |
 |
| Cracked top spring leaf |
 |
| New springs |
 |
| Pressing new bearing races into the hub |
 |
| Assembling the suspension |
 |
| New floor primed and ready for installation |
 |
| New shock absorber bracket bolted into the frame |
 |
| Reassembly of drawbars, landing leg and coupler |
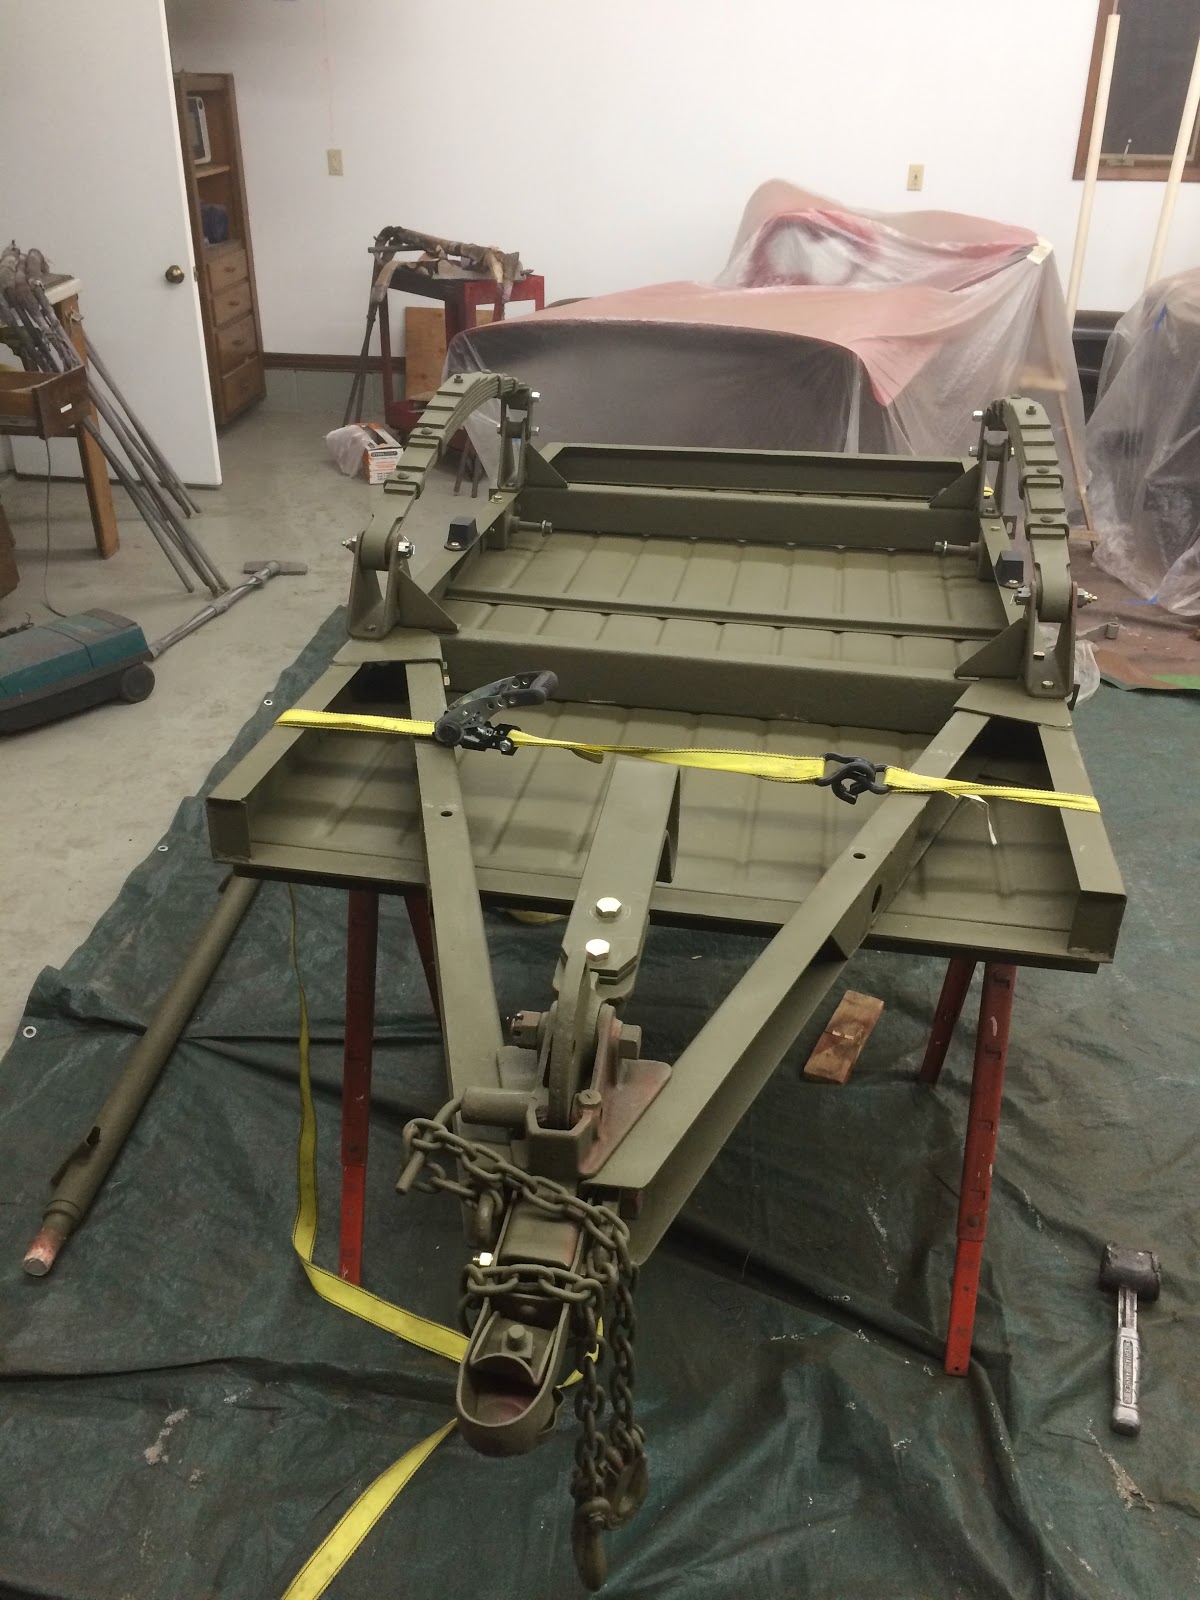
Eventually, all the repairs were made, parts were painted and we reassembled the trailer using all new grade 8 hardware.
Deciding on a paint color was a difficult decision. T3-C trailers were originally available in either red or green. During disassembly of the trailer I discovered several different layers of paint- red, green, olive drab, all shaded by liberal amounts of rust color also. Based on the evidence, originally the trailer was green. There was no way to exactly match the historical color. I did not want a glossy red or green trailer, although that would have been historically correct. I didn't want to have to maintain a shiny paint finish in a working trailer. In the end, I chose to go with the military lustreless olive drab. This color would pay homage to the origin of the trailer while being less obtrusive while camping. The flat finish would help to hide the remaining dents and use marks in the sheet metal. It is also available in spray cans making periodic touch-up easy.
Now like new and far removed from its origin as a "free" trailer, what a transformation we made! I will be eternally grateful for all the help and generosity of Wayne. I could not have accomplished the project without his help. We started the project at the beginning of September and finished it in the middle of October.
Views of the finished trailer:
 |
| Finished! |
 |
| Showing the back end |
 |
| The new floor looks great |
 |
| Tailgate works |
 |
| You can see the new springs and shocks underneath |
 |
| All new wiring for the new tail lights |
 |
| Tail light |
 |
| Tail gate chain hook |
 |
| The hooks hold the tail gate securely |
 |
| Showing the new but true to original data tag |
 |
| Closeup of new data tag made by a company in the Netherlands |
 |
| Wayne- a true gentleman and skilled craftsman |
 |
| Heading out for inaugural tow |
A couple of items remained to be done. The trailer did not originally come with a way to carry a spare tire. The spares were carried on the Jeeps that pulled them. And the trailer needed a lid to be useful to us for carrying camping gear securely. I decided to continue on with these projects over the winter.
Working with Wayne had whetted my appetite to learn welding. So I designed a spare tire bracket as a welding project for myself. I took an introductory welding class at
Twin Cities Maker and was planning on joining the organization to do the project. After the class I realized I had a lot to learn about welding before taking on a project. I decided to get a bid from the instructor to make the bracket. Unfortunately the bid was more than I wanted to spend.
 |
| Design drawing for spare tire bracket. I revised the design as I built it. |
I was kind of stuck on the bracket project. Then one day my friend Bob asked me if I wanted
his Dad's old oxy/acetylene torch set-up. It had been sitting in his
basement for 20 years or so. I said sure, why not. A new path had opened up. I embarked on learning how to
cut steel and weld using a torch.
 |
| The oxy/acetylene torch set-up donated by Bob |
I watched some instructional YouTube videos and scrounged some scrap steel to practice with. I had to track down some welding rod which was hard to find. It seems torch welding is fast becoming a rare endeavor. Along the way I had to replace both the oxygen and acetylene tanks, as
well as the hoses, which cracked from age as soon as I started using
them. I also bought an angle grinder (another lesson in free things
becoming expensive). I experimented with different torch tips and learned to reliably get a neutral flame. My first attempts were pretty ugly but I eventually figured out how to make a decent weld. My attempts at cutting steel with the torch were effective but crude. I ended up using a cut-off saw and angle grinder for cutting duties.
The process of welding with a torch happens more slowly than with a wire feed welder. I was able to see what was happening and adjust what I was doing to get a better result. I realized that in class with the wire feed machine, I couldn't see what I was doing. The dark helmet lens and my glasses did not allow my eyes to focus where they needed to focus. I had better luck seeing what was going on with the torch. Eventually, I was able to make a pretty decent weld.
 |
| Early cutting and welding practice |
 |
| Ugly weld- more practice needed |
 |
| Getting better but more practice needed |
 |
| Now welding for real- not bad |
 |
| I think I got this welding thing |
 |
| I can live with that |
 |
| The bracket taking shape |
 |
| Finished |
 |
| Test fit. I cut u-bolts to attach to the drawbars. |
 |
It fits. To prevent tipping, there is a plate on the bottom
(not visible in this view) that extends under and bolts to the
trailer front cross member.
|
 |
| Finished and installed |
 | | | |
| Another view of the finished bracket |
|
|
|
 |
| Spare tire mounted to new bracket |
The spare tire bracket turned out surprisingly well, considering the novice factor. It is very sturdy and looks good too.
Next up was making a lid. I chose to make the lid out of wood rather than steel for weight, cost and ease of construction. I wanted to make a secure lid that would not require any modifications to the trailer, and could be easily removed if I wanted to use the trailer for hauling mulch or whatnot.
I worked during off hours at the boat shop where I volunteer- lots of space and lots of clamps. The lid needed to be wider than a full sheet of plywood. I canted the sides to narrow the top so I could use a single sheet of plywood with no seam. I used biscuit joinery and epoxy to make strong joints. My friend Ed loaned me his biscuit joiner which was a big help.
 |
| Lid during construction |
 |
| Detail showing biscuit joinery |
 |
| Lots of clamps needed |
 |
Test fit and primer coat. You can see a little dolly I made under the
landing leg. Makes moving the trailer around easier. |
 |
| Finished lid in place. Testing locking strategies. |
 |
| Added a roof rack for kayaks and bikes |
 |
Another view of rack and handles. I added metal wear strips on
the sides of the lid to protect the wood from the tie-down straps |
 |
| Detail showing handles |
 |
| Showing open lid and brace. A strap secures it against wind gusts. |
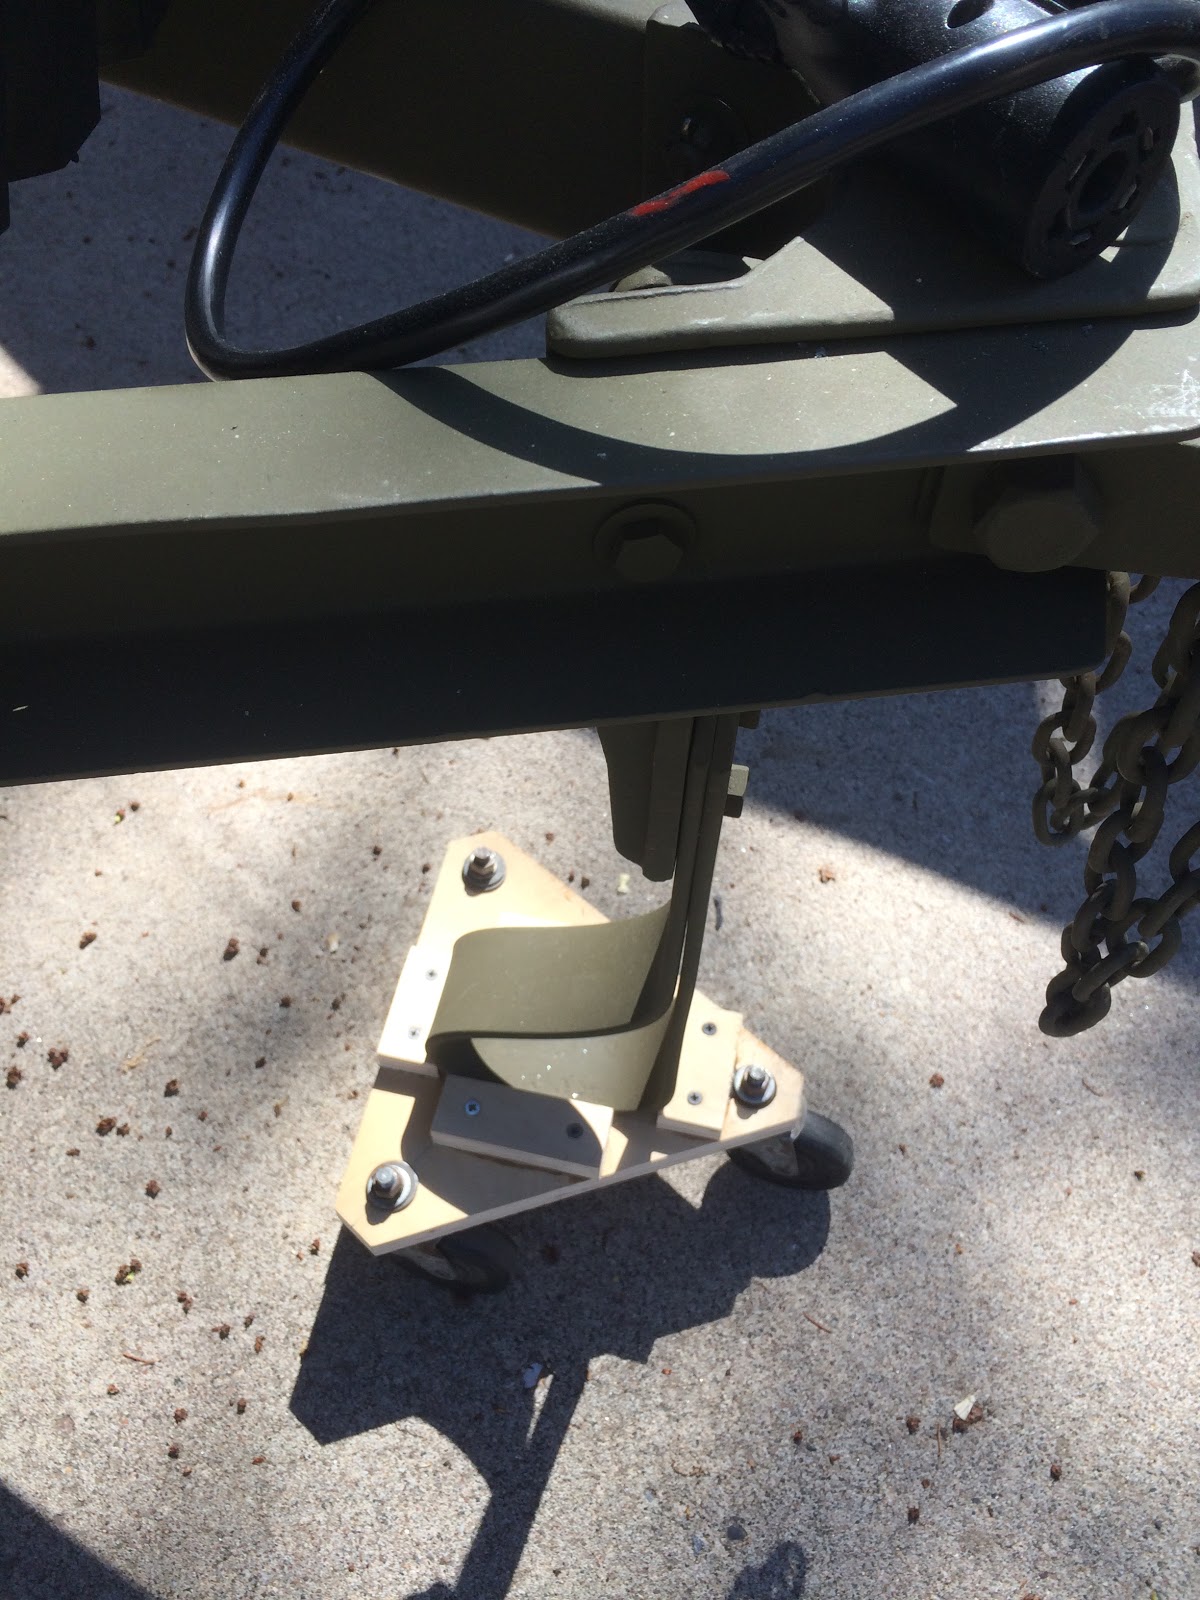
Along the way I made a little dolly out of wood scraps and some old casters- makes moving the trailer around a breeze.
 |
| Wheeled dolly for landing leg |
The lid turned out great. It sits on top of the trailer, overlapping the sides for a water/dust seal and rotating around the top rail on one side to open. The tailgate is locked by the lid but can be opened by lifting the lid slightly. A simple stick and restraining strap holds the lid fully open. Ratchet straps hold it down for transport and a cable locks it closed. I mounted a roof rack to the lid for transporting kayaks or our bicycles. The whole thing easily lifts off to use the trailer for hauling mulch and other bulk items.
The finished trailer will make a great addition to our camping set-up, getting weight out of the truck and making a secure place to store gear in camp while we go exploring. It was a fun project to do and turned out great.
Note: I made a new coupler since this post was written. You can read about it here:
https://travelswithrockythedog.blogspot.com/2019/07/trailer-update.html
Epilogue
After finishing the trailer, I shared some photos of it with the person I got it from. He was very excited to see them. In return, he shared some photos of the trailer being used by his father for a fishing trip to Lake Nipigon in Ontario in the early 1950s, when the trailer was still relatively new. That was a fun exchange and adds to the joy of having brought the trailer back to useful life for years to come.
 |
| On the way to Lake Nipigon |
 |
| On the dock at Lake Nipigon |
 |
| Unloading gear and supplies from the trailer |
 |
| You can see the boat on the left |
 |
| The trailer is in the garage. Quite a few fish! |


Amazing transformation. I know you put a lot more money in than you planned, but the learning experiences will benefit you even more. I hope you have many years enjoying your travels.
ReplyDeleteBrenda, thanks for your comment. I have no regrets. :)
DeleteWhat a story and such a great piece of history now following you down the road on your adventures. Well done and congratulations!
ReplyDeleteSki, thanks for the comment, I appreciate it.
DeleteWow, impressive work! Your story and pictures are "riveting." Congratulations on transforming this relic of bygone days into a lil beauty with new road adventures ahead.
ReplyDeleteHa, nice pun. Thanks for the comment.
DeleteNeat. Nice job, and I wish I had your skills on construction.
ReplyDeleteThanks for your comment.
ReplyDeleteFantastic build and write up! I also have a T3-C that I recently acquired, could you point me in the right direction for rims and tires? I’m looking to add a spare and revert back to military style tires like yours. Thanks in advance!
ReplyDeleteDustin, there are several suppliers for wheels and tires. Search for Willys CJ2A parts, the trailers used the same parts. I got my tires from Coker Tire. Thanks for your comment!
DeleteGreat blog, great stories, and nice work on your Bantam restoration/conversion! I have a 1953 M100 jeep trailer made by Strick for the Korean War that I use with my 1947 Willys CJ2A. It's almost identical to your T3-C. I am going to steal your design for the trailer dolly--beautifully simple! Thanks for sharing.
ReplyDeleteThanks for reading and your comments. You are welcome to the dolly design- I just used what I had handy.
DeleteMind sharing part numbers for the leaf spring packs, shackles, and hardware for them if you have that?
ReplyDeleteJake, sorry, I don't have the part numbers handy. Most of the parts are the same as the Willys CJ2A jeeps and are readily available from numerous suppliers. I used Walck's, D&L Benzinger and a few others. You will find them all by searching for CJ2A and Bantam trailer parts. Good luck and thanks for your comment.
ReplyDelete
ReplyDeleteThis is awesome!! I’ve always enjoyed reading your blog.
buy chrysler spare parts
chrysler salvage wreckers australia
This is awesome
ReplyDeleteI here did you find replacement tail lights ?
The tail lights are just inexpensive hardware store trailer lights. They fit perfect though so I am fine with them. When the bulbs burn out I will replace them with LED bulbs.
ReplyDelete